Background
With modern technologies and available Frameworks, we have successfully eliminated the complexities involved in building an end to end Application and have eased the entire development and deployment process to a great extent. As we finish writing the Application and our next goal is to publish it as an open source project or push it to production, a major component that will make the code more appealing and useful is having a proper documentation about the nitty-gritty involved in the development process.
Few days back a similar requirement came up in my team and I was asked to build an application that can host our internal documents (markdown pages) and implement a secure layer to restrict the access to teams / Pivotree specific users.
An application that was earlier used to manage the markdown contents was MkDocs, which implements Pyhton-Markdown library to render Markdown documents to HTML. It was hosted on AWS Amplify and secured using basic Access Control for amplify hosted applications. Although it was working flawlessly, the challenge was to put a more secure layer of Authentication on top of it (e.g. OneLogin, Cognito, Auth-0). This application was using shared credentials which restricts its usability to wider audience.
To keep things simple, we started doing some research and came up with an alternative which is built on top of React JS called Gatsby. But before we jump on the development/implementation, we need to get familiar with few components involved in building an application using Gatsby.
Static Site Generator - Gatsby
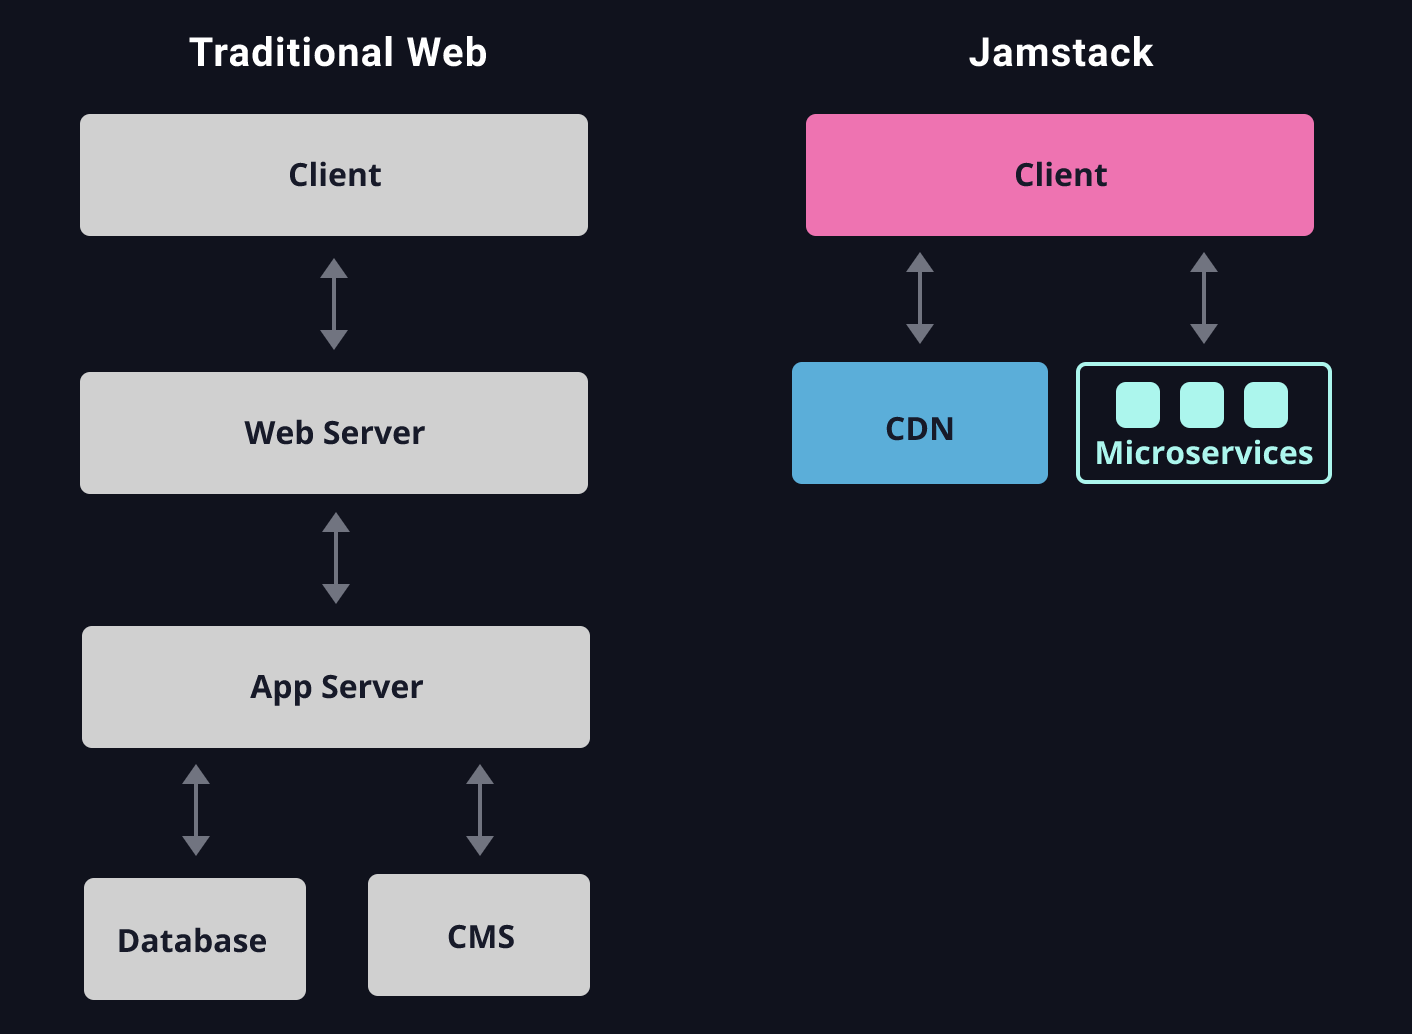
In a conventional 3-Tier monolithic/ microservice architecture we have a Front-End hosted on a webserver like Apache or Nginx as Tier-1, a middle-tier which has the application/ services and Tier-3 which is composed of the back-end databases. Whenever a call is made from the client, the request goes all the way to database and fetches the data for the UI. This sometimes can degrade the application performance based on the time spend on back-end query execution, query execution plan and the volume of the requested data.
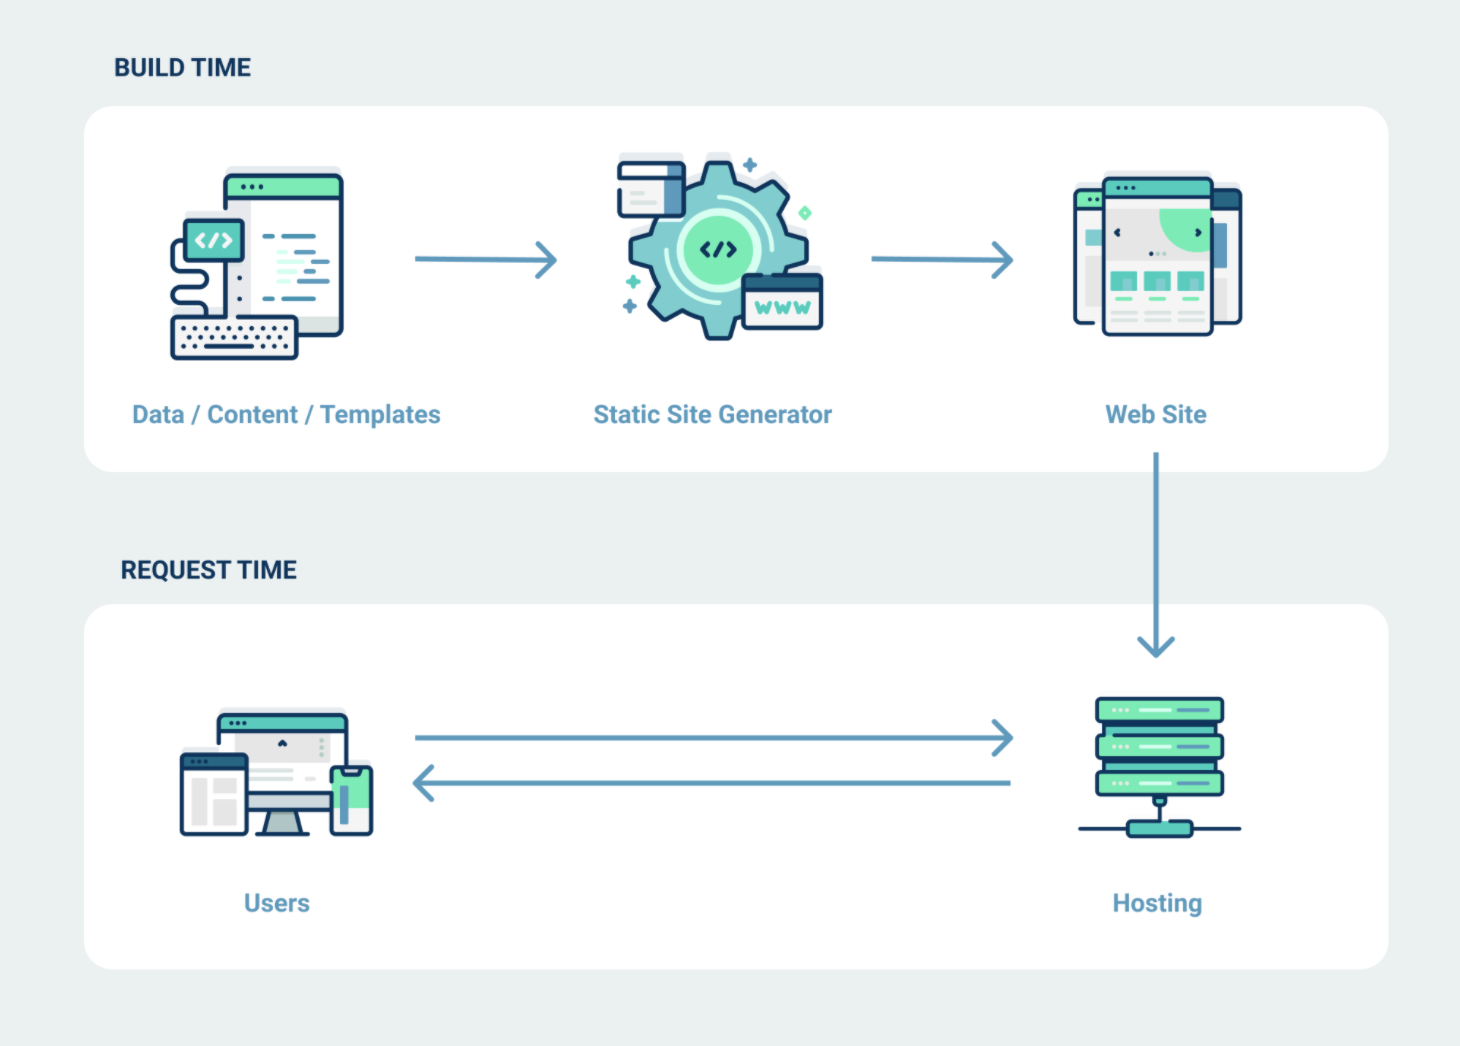
Gatsby on the other hand precomputes all states in this case, assets and dynamic content or data so webpage loads are blazing fast. This is implemented using JAMstack architecture, which pre-delivers stable markup to render the page structure and appearance and then uses JavaScript-based client-side service workers to serve up dynamic content via APIs. The Gatsby framework anticipates what is likely to be requested next, then starts to fetch and preload that content in the background before it’s even requested by the browser.
GraphQL
Gatsby uses GraphQL to pull data from the markdown files. The result of the query (JSON output) is injected by Gatsby into the Template component as data.
Sample Query
Input
  hero(episode: $episode) {
    name
    friends {
      name
    }
  }
}

{
  "episode": "JEDI"
}
Output
{
  "data": {
    "hero": {
      "name": "R2-D2",
      "friends": [
        {
          "name": "Luke Skywalker"
        },
        {
          "name": "Han Solo"
        },
        {
          "name": "Leia Organa"
        }
      ]
    }
  }
}
Starting with Gatsby
- Fork a theme that we want to use as per the requirement from starter libraries- Here1
git clone <Repository_Link>
- Navigate into your new site’s directory
cd <project_folder_path>
- Install all dependencies mentioned in package.json (if any) for the downloaded starter code.
yarn install
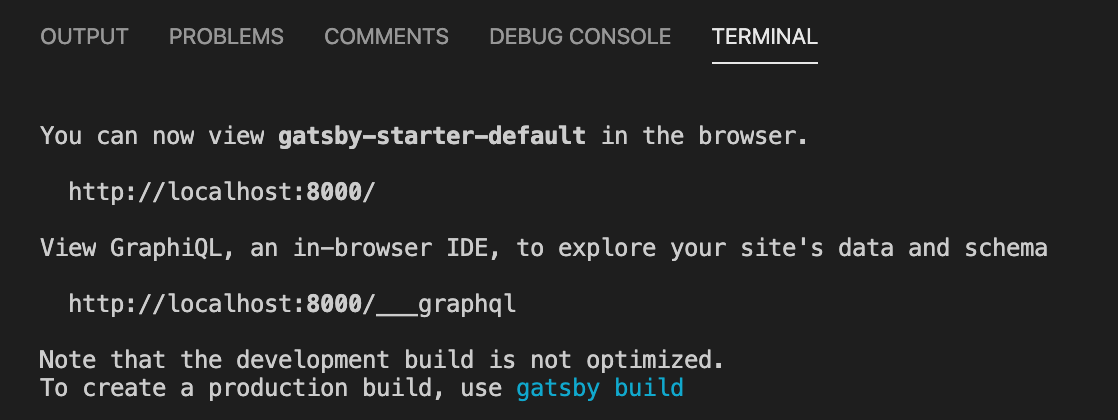
- Run the project on local server using below command.
gatsby develop
- If everything worked fine we should be getting the app served at localhost:8000.
- We can create a separate branch for version control (Git, Bitbucket, etc.) and push our changes accordingly.
Architecture - Gatsby Application
Implementation
Below screenshot shows the working directory structure and high-level view of the authentication code used to secure the application. Before we dive deep into authentication implentation let’s have some basic understanding on the individual components like Auth-0 and OneLogin.
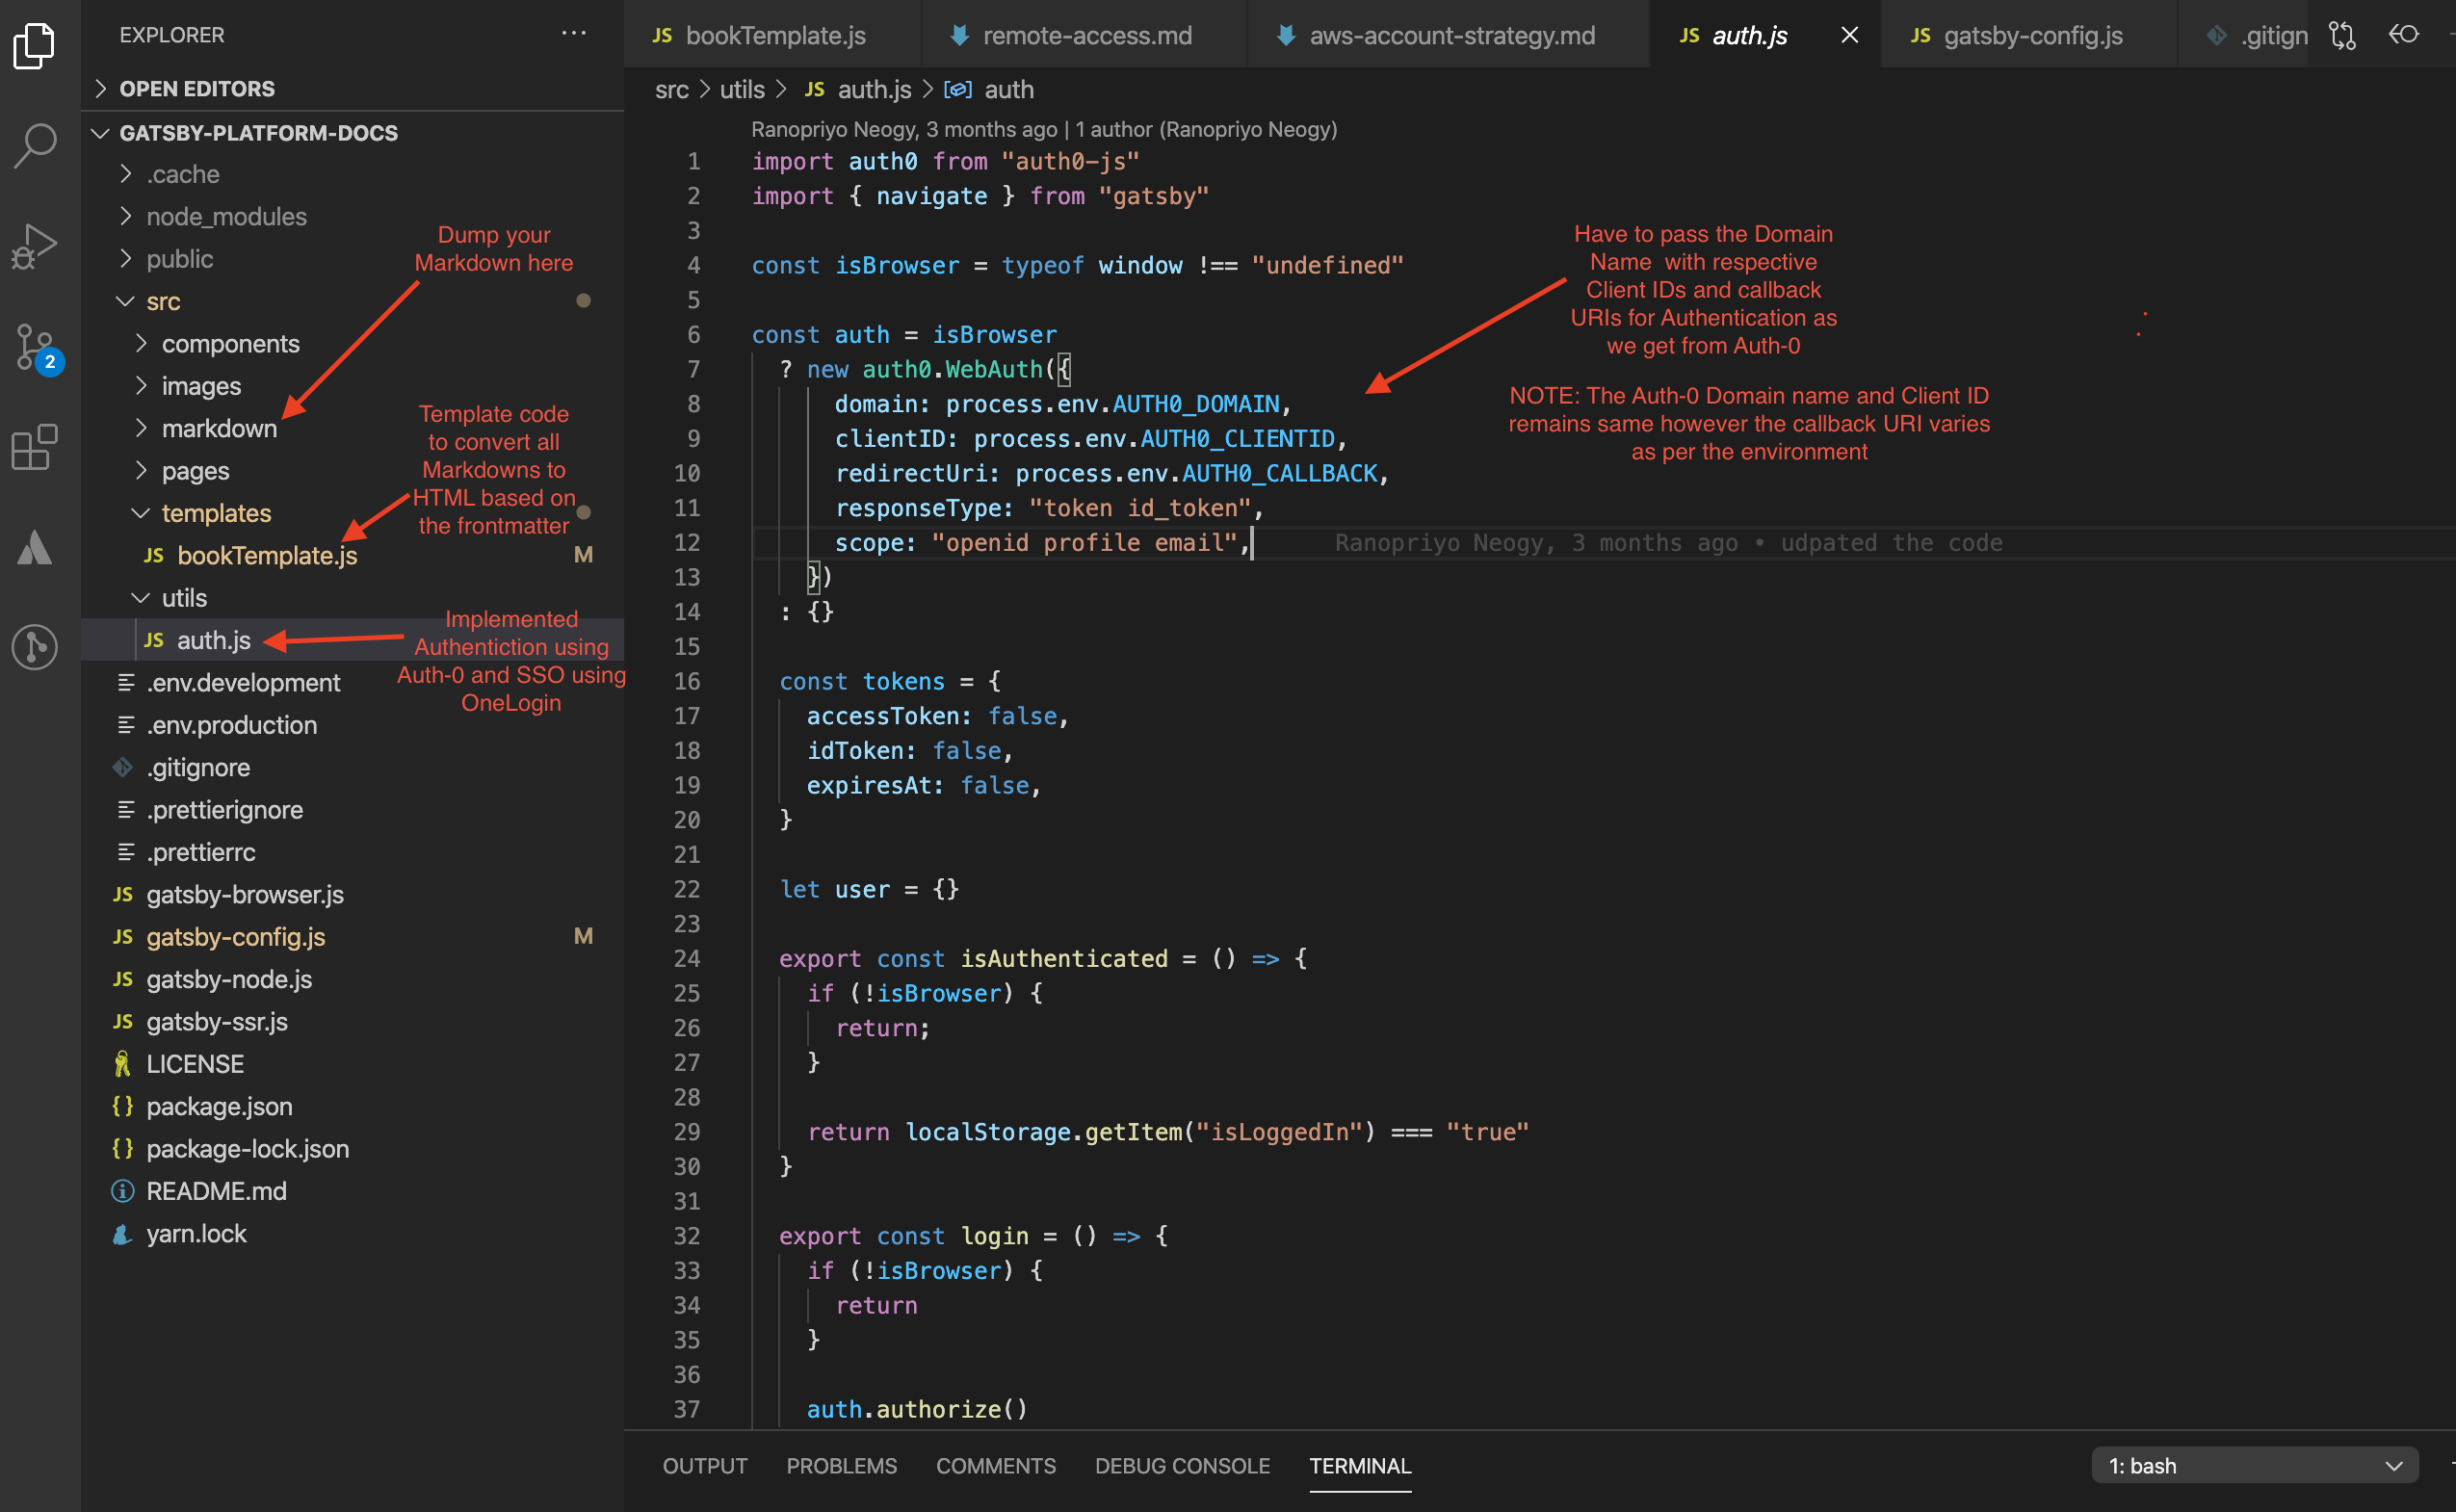
Authentication
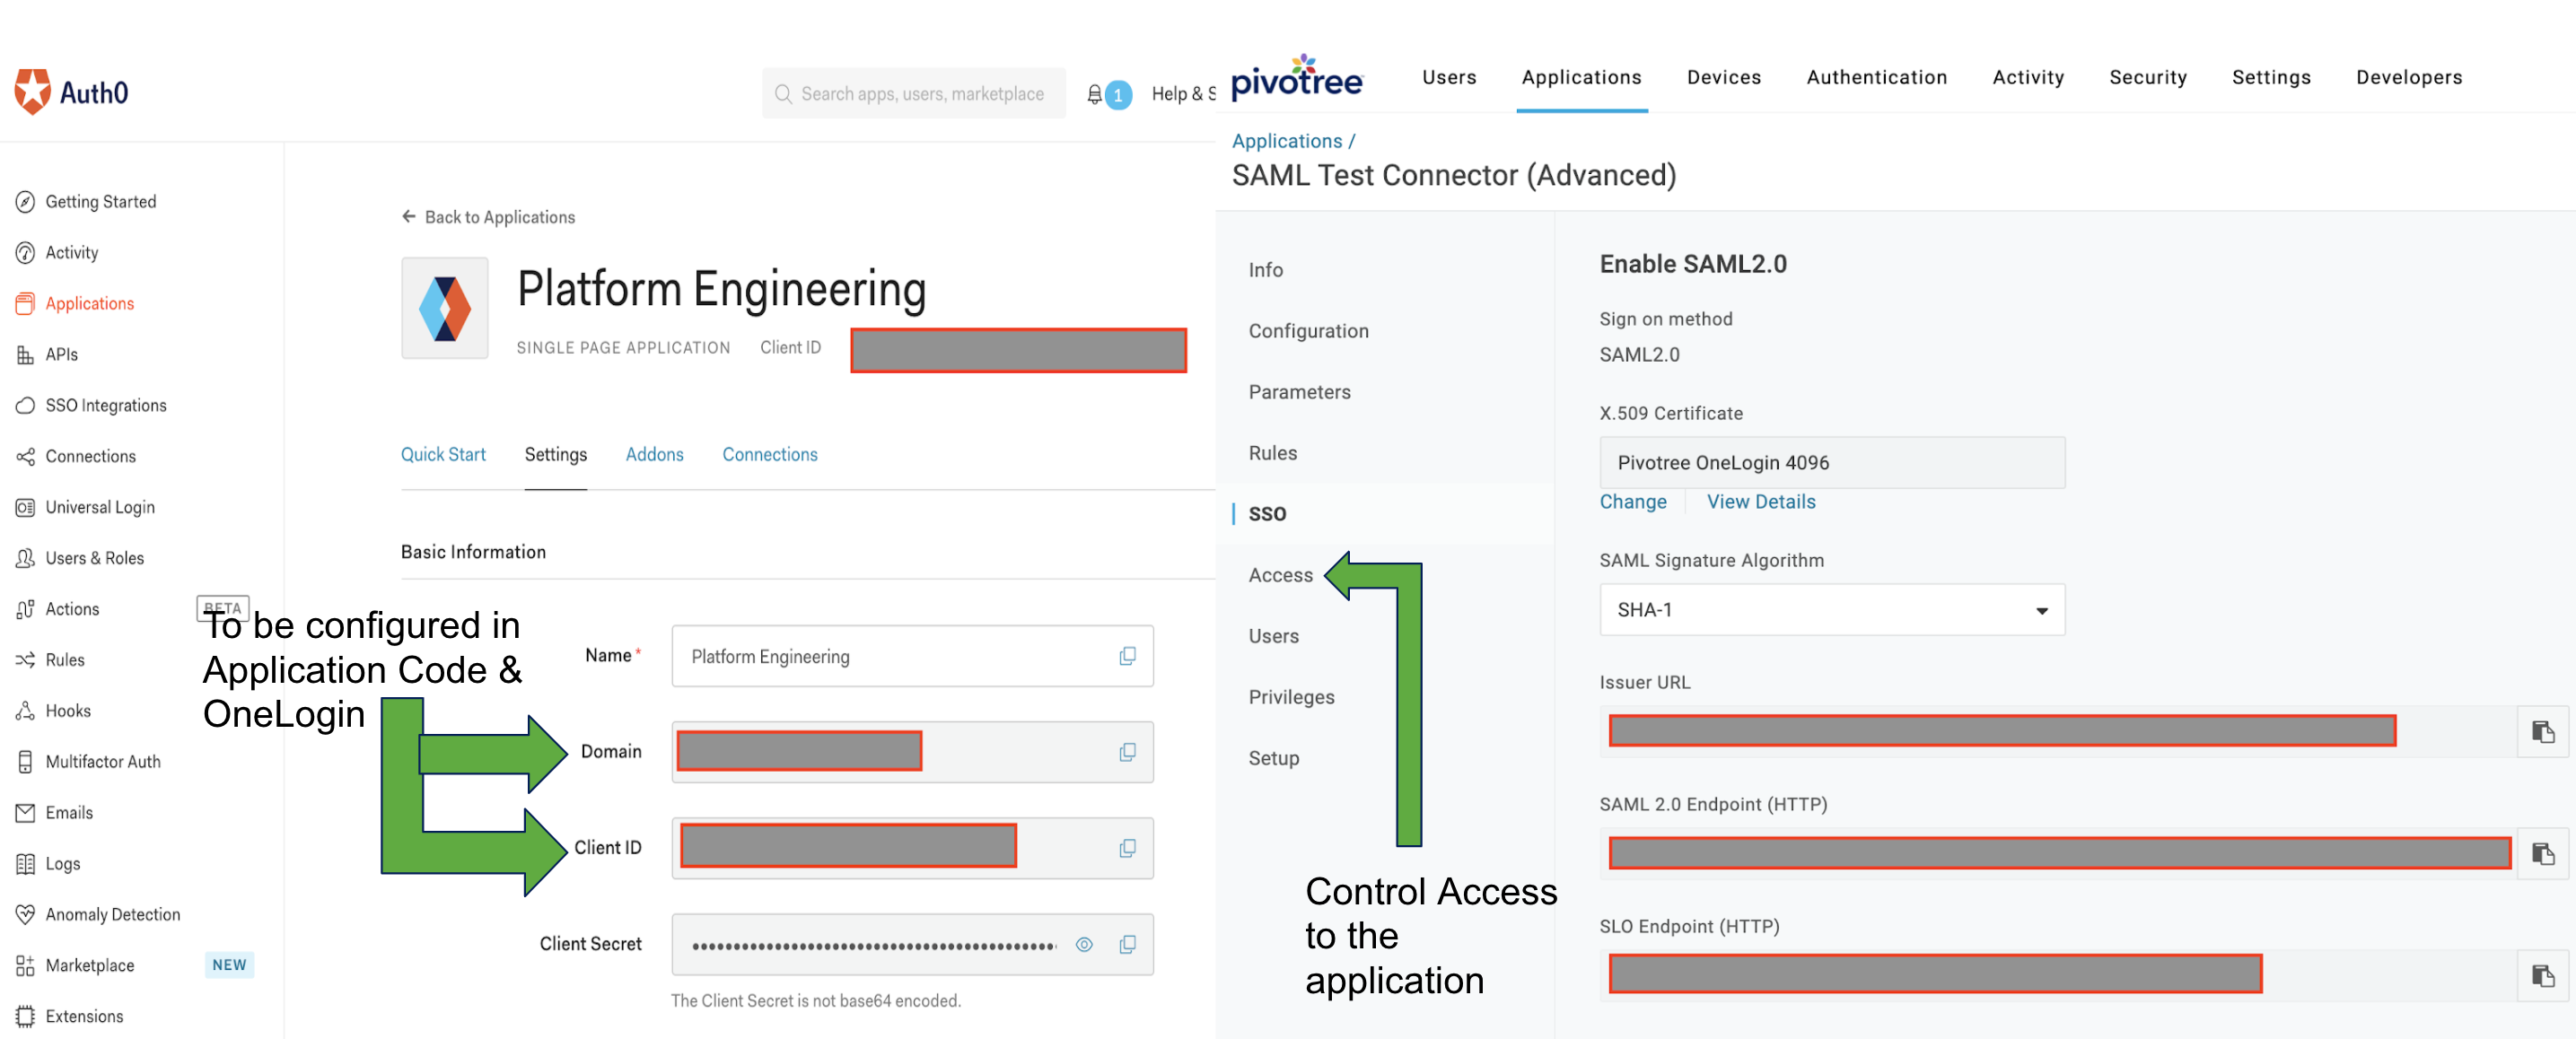
Auth0
- Auth0 is a flexible and easy to use solution to add authentication and authorization services to our applications.
- We can connect any application (written in any language or on any stack) to Auth0 and define the identity providers you want to use (how you want your users to log in).
- Each time a user tries to authenticate, Auth0 will verify their identity and send the required information back to your app.
- We can use Auth0 for free with up to 7,000 active users, unlimited logins.
- To get started with Auth-0 we can register on their website2 and start using the service.
OneLogin
- OneLogin Single Sign-On uses Security Assertion Markup Language (SAML) to simplify the login process.
- The single sign-on services provided by OneLogin is very helpful and of vital importance while rolling out new applications to the whole organization, no matter the location or time zone.
- Allow end-users to login to OneLogin using their Social Identity Provider credentials from services such as Facebook, Google, LinkedIn, and Amazon.
- SSO saves time and energy because users are not required to repeatedly log into multiple applications.
Console - Auth0 and OneLogin
Frontmatter - Metadata in Markdown Files
---
path: "/account/architect-and-design/aws-account-strategy"
type: "pdocs"
---
Template - To Display Markdown to HTML post Authentication
 function Template ({data}) {
    if (!isAuthenticated()) {
        login()
        return <p>Redirecting to login...</p>
      }

      const { markdownRemark } = data
      const { frontmatter, html } = markdownRemark
      //const user = getProfile()


    return (
        <Layout>
        <SEO title={frontmatter.title} />

        <h1>{frontmatter.title}</h1>
        <div
            dangerouslySetInnerHTML={{ __html: html }}
        />
        </Layout>
    )
  }
Securing the central component
import React from "react"
import { Router } from "@reach/router"
import { login,isAuthenticated, getProfile } from "../utils/auth"
import Layout from "../components/layout"

const Home = ({ user }) => {
return <p>This static site has all necessary information about Platform Engineering in Pivotree...</p>
}

const Account = () => {
  if (!isAuthenticated()) {
    login()
    return <p>Redirecting to login...</p>
  }

  const user = getProfile()

  return (
  <Layout>
    <>
      <Router>
        <Home path="/account/" user={user} component={Home}/>
      </Router>
    </>
    </Layout>
  )
}

export default Account
Auth.js
import auth0 from "auth0-js"
import { navigate } from "gatsby"

const isBrowser = typeof window !== "undefined"

const auth = isBrowser
  ? new auth0.WebAuth({
      domain: process.env.AUTH0_DOMAIN,
      clientID: process.env.AUTH0_CLIENTID,
      redirectUri: process.env.AUTH0_CALLBACK,
      responseType: "token id_token",
      scope: "openid profile email",
    })
  : {}

  const tokens = {
    accessToken: false,
    idToken: false,
    expiresAt: false,
  }

  let user = {}

  export const isAuthenticated = () => {
    if (!isBrowser) {
      return;
    }

    return localStorage.getItem("isLoggedIn") === "true"
  }

  export const login = () => {
    if (!isBrowser) {
      return
    }

    auth.authorize()
  }

  const setSession = (cb = () => {}) => (err, authResult) => {
    if (err) {
      navigate("/")
      cb()
      return
    }

    if (authResult && authResult.accessToken && authResult.idToken) {
      let expiresAt = authResult.expiresIn * 1000 + new Date().getTime()
      tokens.accessToken = authResult.accessToken
      tokens.idToken = authResult.idToken
      tokens.expiresAt = expiresAt
      user = authResult.idTokenPayload
      localStorage.setItem("isLoggedIn", true)
      navigate("/account")
      cb()
    }
  }

  export const handleAuthentication = () => {
    if (!isBrowser) {
      return;
    }

    auth.parseHash(setSession())
  }

  export const getProfile = () => {
    return user
  }


  export const silentAuth = callback => {
    if (!isAuthenticated()) return callback()
    auth.checkSession({}, setSession(callback))
  }

  export const logout = () => {
    localStorage.setItem("isLoggedIn", false)
    auth.logout()
  }
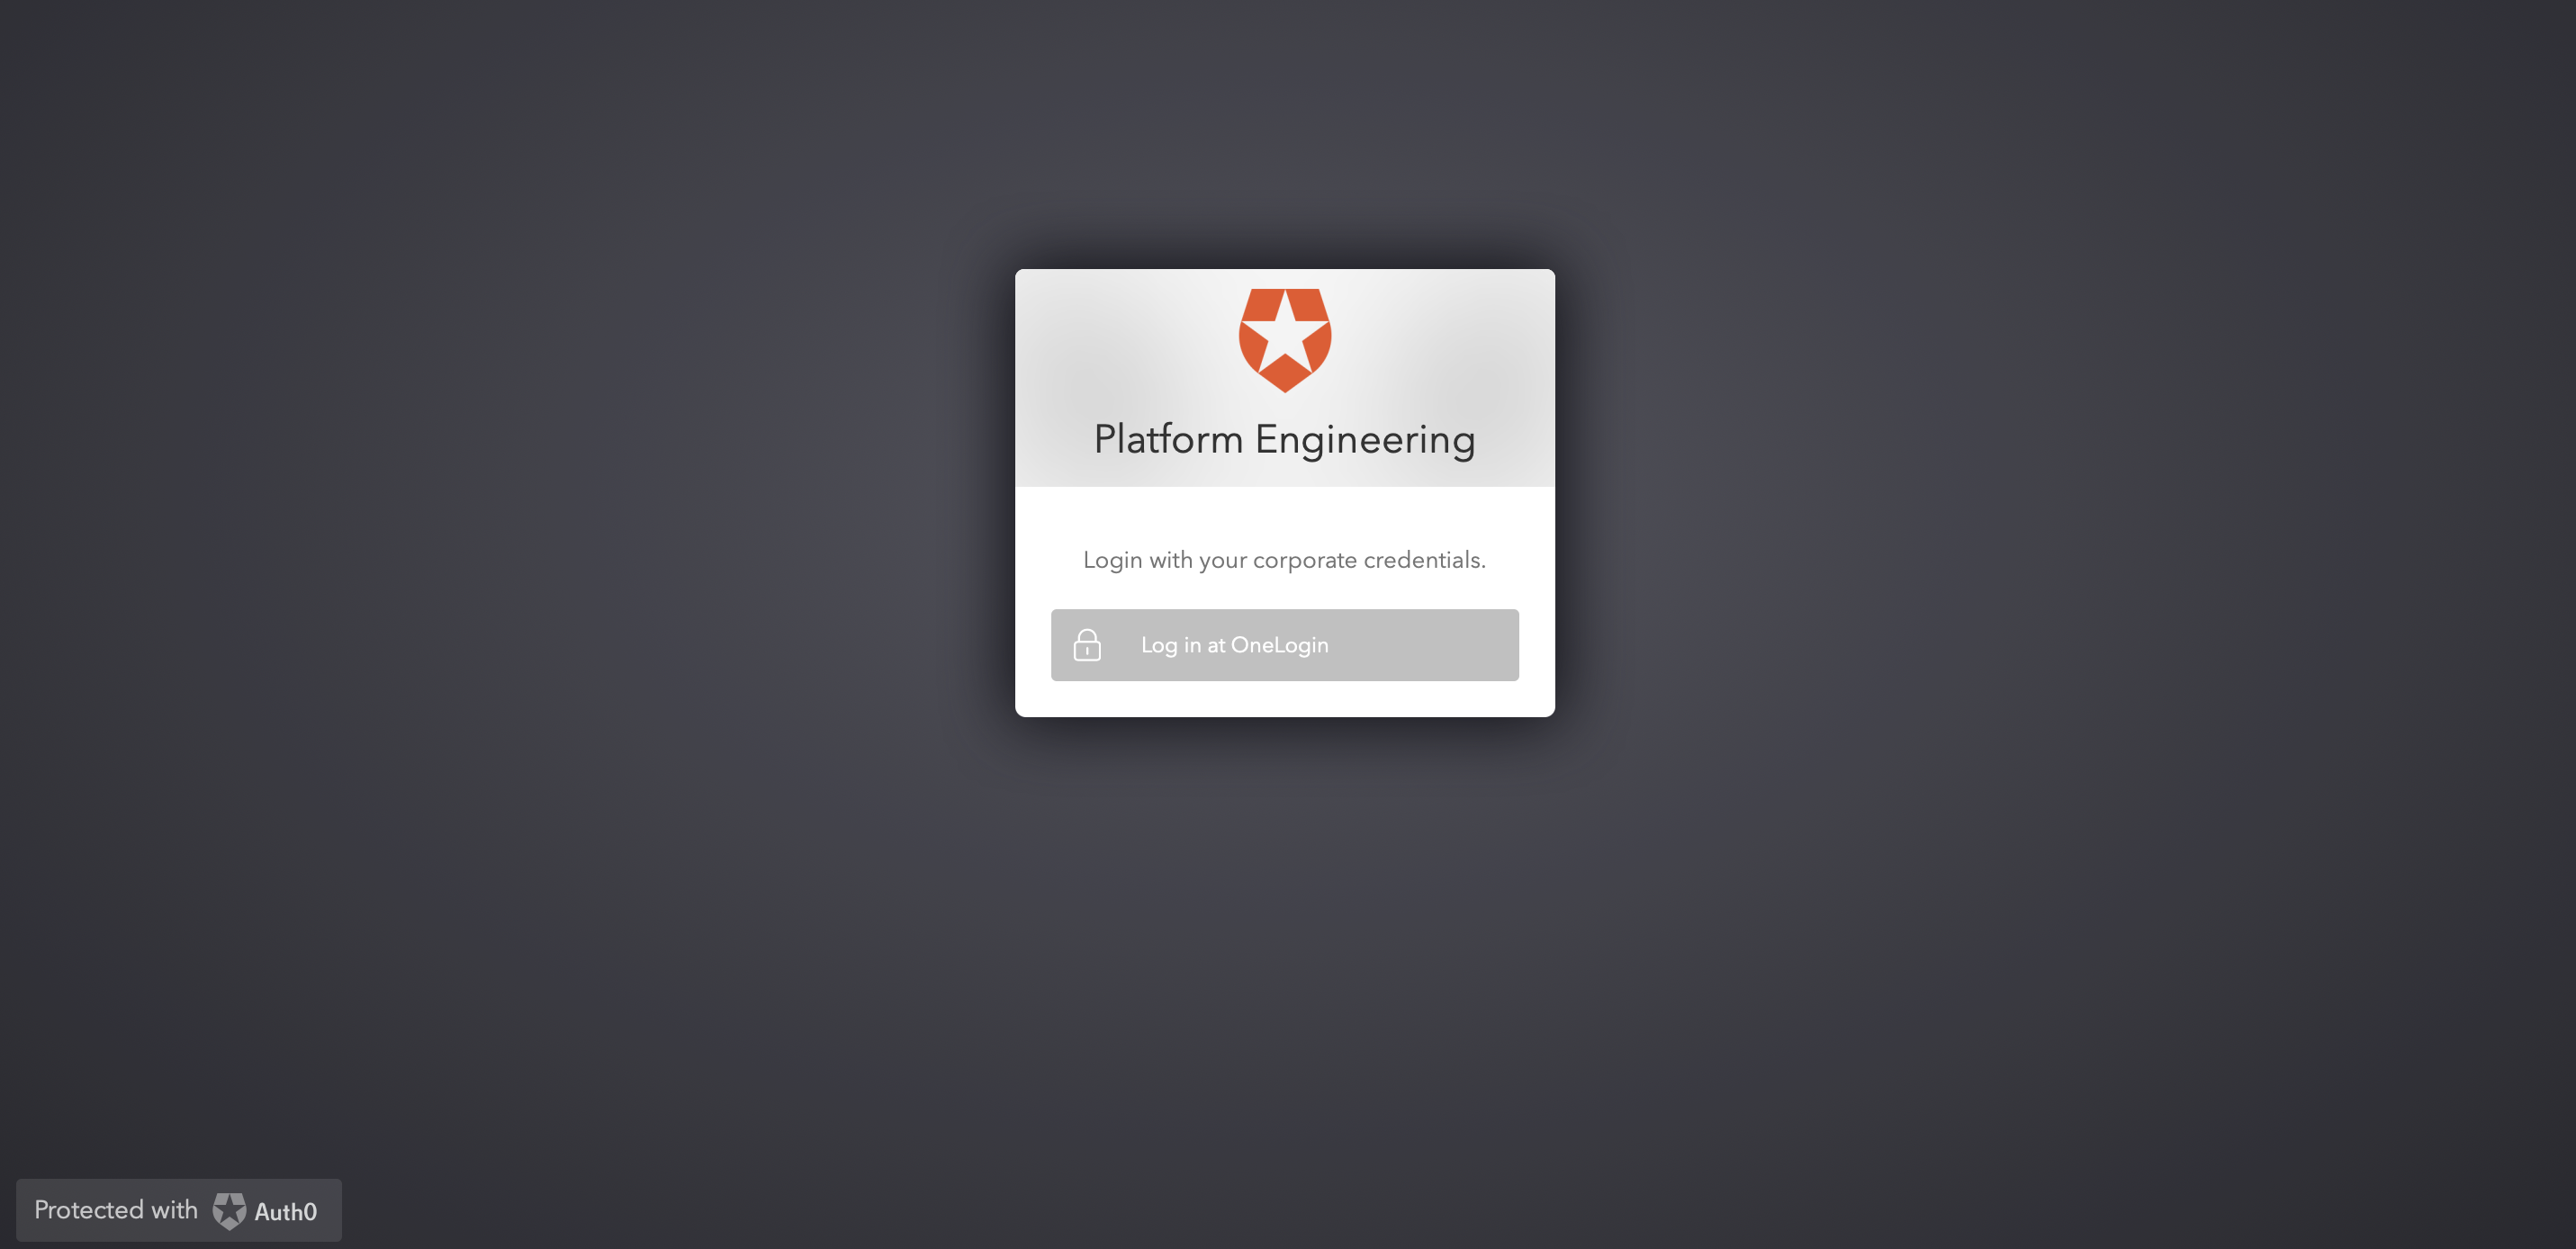
The Application is now secured with Auth0 and SSO enabled using OneLogin
Hosting
There are multiple options available to host the website like GatsbyCloud, Netlify, S3, Heroku and many more. However, I always find it easy and interesting to deploy using AWS Amplify. Although it’s my personal preference you can always use any of the above mentioned.
Deploying an application through Amplify can be done using both Amplify CLI and console. Here are some basic commands to deploy using CLI.
In the project folder we must initialize the Amplify using amplify init. After this we can add hosting using amplify add hosting. Since in this scenario I have used Auth-0 for authentication, however as an alternative we can also use Amazon Cognito for authentication using amplify add auth and further configure it with SAML, Google, Facebook or Amazon as Federated Identity providers. We can modify the amplify.yaml file as per our build requirements.
Detailed steps to host the website using Amplify console:
-
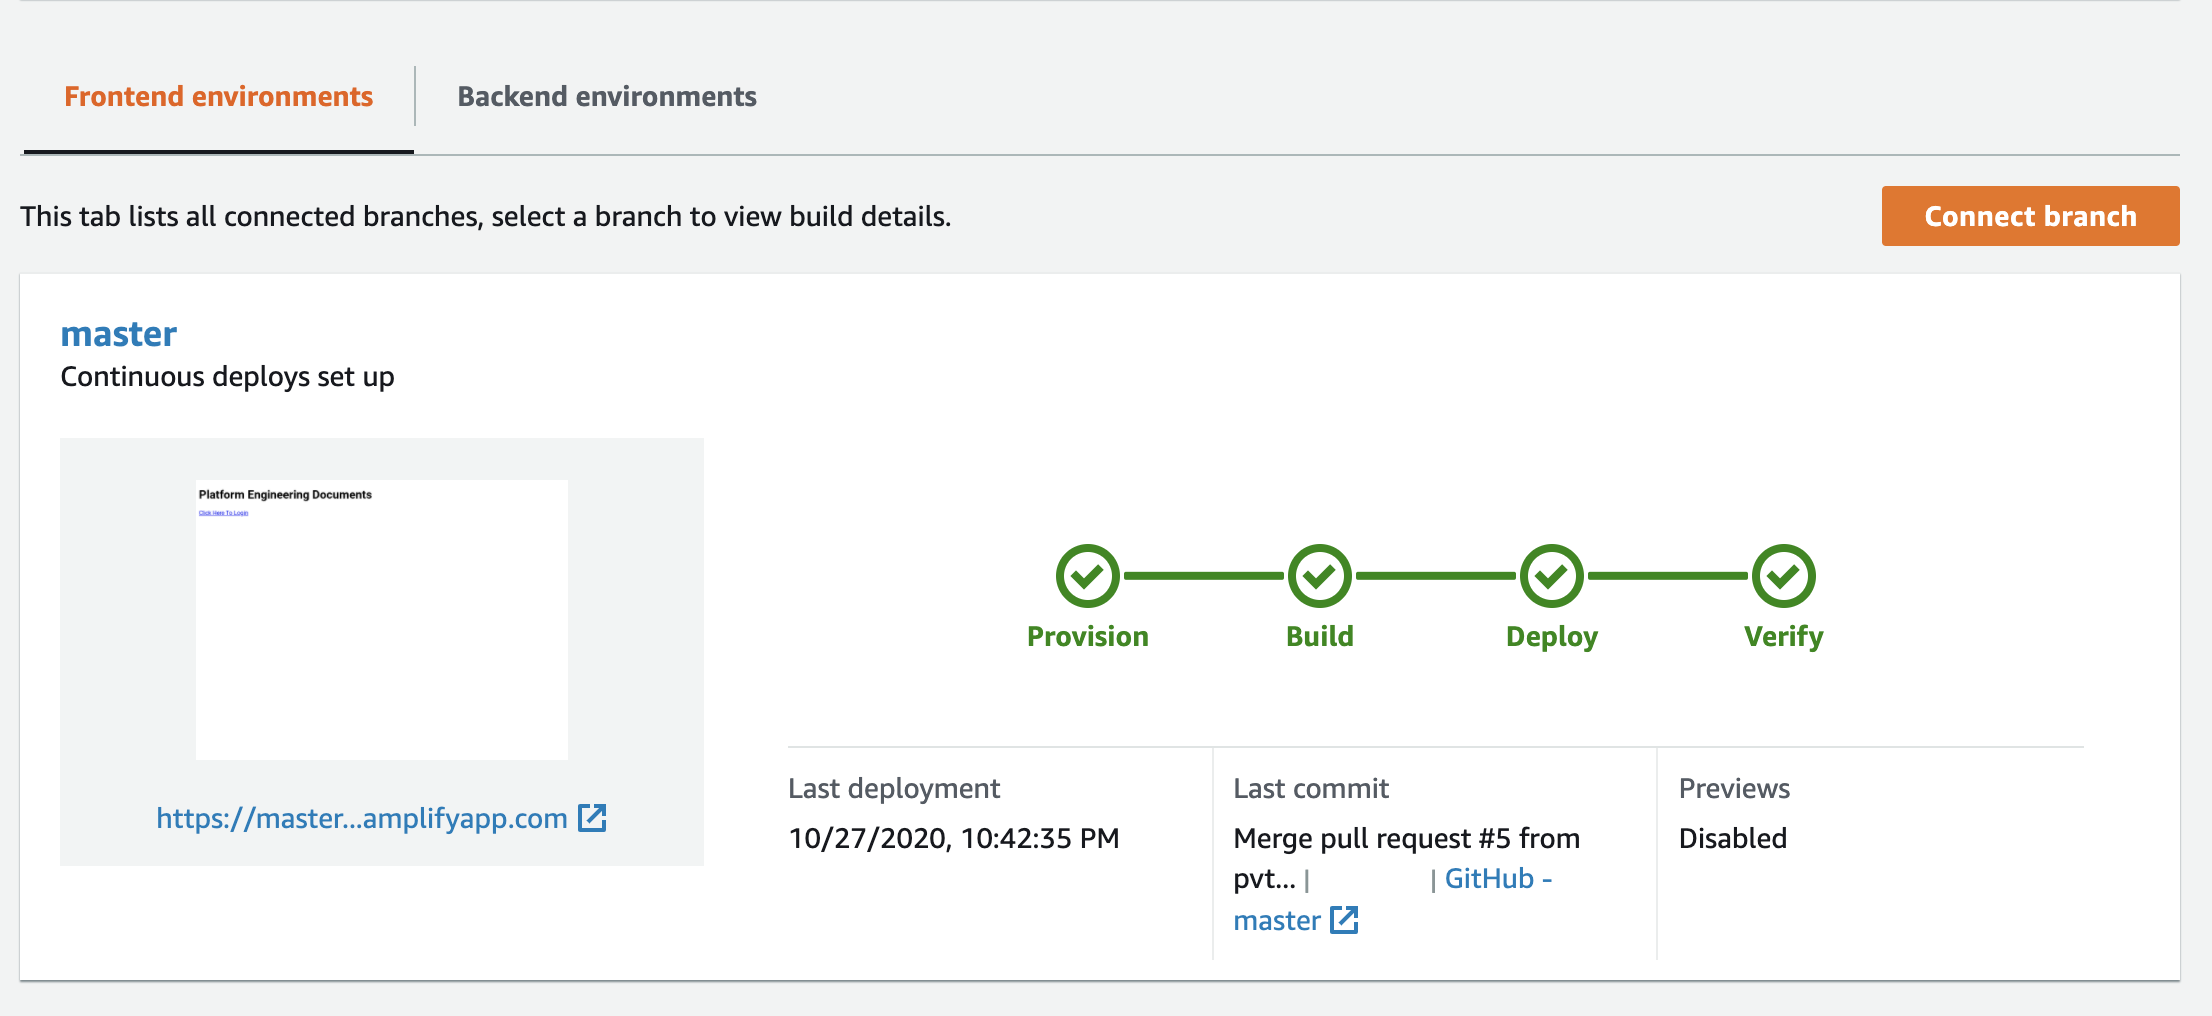
Log in to the AWS Account, navigate to Amplify Console and choose Get Started under Deploy.
-
Connect a branch from your GitHub, Bitbucket or GitLab repository. Connecting your repository allows Amplify to deploy updates on every code commit to a branch.
-
Accept the default build settings. Give the Amplify Console permission to deploy backend resources with your frontend with a service role. This allows the Console to detect changes to both your backend and frontend on every code commit and make updates.
-
Review your changes and then choose Save and deploy. The Amplify Console will pull code from your repository, build changes to the backend and frontend, and deploy your build artifacts at https://master.unique-id.amplifyapp.com. Bonus: Screenshots of your app on different devices to find layout issues.